What is a Joint Seal Contractor or Sealant Applicator (Internal)?
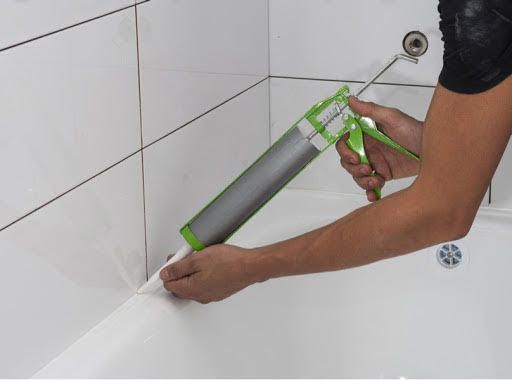
A Joint Seal Contractor or Sealant Applicator is a specialist who applies flexible sealant products — such as silicone, polyurethane, or acrylic sealants — to internal gaps and junctions. This ensures your wet areas (like bathrooms, laundries, and kitchens) are waterproof, airtight, and neatly finished.
Internal joint sealing typically happens after tiling, joinery, and painting, but before the final handover.

What does a Joint Seal Contractor do?
Your contractor will complete works according to your agreed scope of works.
Typically, they will:
- Inspect junctions where walls, floors, tiles, benchtops, and splashbacks meet
- Clean and prepare surfaces to ensure good sealant adhesion
- Apply the correct sealant for the material and location (e.g., neutral cure silicone for natural stone)
- Smooth and finish joints for a professional, neat appearance
- Allow appropriate curing time for waterproof protection
Some contractors also offer colour-matched sealants to better blend with finishes.

Tip: Seal at the Right Time to Avoid Rework
Make sure all tiling, painting, cabinetry, and flooring are fully complete before sealing — rework after sealing can damage the finish.
And don't let your painter silicone gaps they shouldn’t — joint sealers use better, more flexible products suited to expansion and waterproofing.
What to look for in a Joint Seal Contractor
When reviewing quotes, look for:
- Experience with residential internal joint sealing
- Clear scope covering all wet areas (bathrooms, laundry, kitchen)
- Product specifications matched to finishes (tiles, stone, timber)
- Flexibility in timing (works happen late in the build)
- Warranty on workmanship and sealant product performance
- It's a bonus if they can colour-match sealants to grout or benchtop finishes.
Before You Begin: What You’ll Need Ready
To get quotes from Joint Seal Contractors for Internal Sealing, you’ll need:
- Confirmation that tiling, joinery, and painting are fully complete
- Site access and approximate number of areas needing sealing
- Any special finish requirements (e.g., colour-matched silicone)
- Timeline for completion (before final inspections)
- Preferred curing period (some projects may need fast-cure products)
Average Timeframe
For this task, Pros typically provide quotes within
7-10 business
days.
When Can I Expect Quotes?
Timeframes often vary based on demand and the type of Pro you're engaging (e.g. a plumber). If additional communication or clarification is needed is needed, the quoting process may take longer.
Don't be alarmed if you don't receive quotes or communication from any Build Buddy Pros straight away. Some work is more complex and the Pro may need time to comprehend your documents or scope of work. Depending on the job, there may even be some work required by the Pro before they are able to quote (e.g. a site visit might be required).
If the average timeframe indicated here has passed, and you have not received any messages or quotes, please feel free to contact the Build Buddy Expert Guidance and Support team for an update on quoting for this task.
Frequently Asked Questions
How long after sealing can I use wet areas?
Typically 24 hours, but check the curing time for the specific sealant used.
Can the sealant match my grout or stone?
Yes — many sealants come in a range of colours to closely match grout, stone, or tiles.
How to Complete this Task?

STEP 1
Review and Adjust the Scope of Works
Timeframes may vary based on demand and the type of Pro you're engaging (e.g., a plumber). If additional communication or clarification is needed, the quoting process may take longer.

STEP 2
Confirm Required Documents Are Uploaded
Check that the following required document(s) are uploaded for this task. These are essential to proceed:

STEP 3
Update the Quality Assurance Checklist
Go to the
Quality Assurance tab in this task and review the checklist. Edit any details to suit your project requirements. Being clear and upfront helps set expectations with the Pro. Updating the checklist before requesting quotes ensures everyone is aligned.

STEP 4
Request Quotes
Click the
orange ‘Request Quotes’ button to start the quoting process.

STEP 5
Review the Quotes
Once you receive quotes:
- Review each one carefully, including the payment schedule and any special terms
- Download attached quote documents for detailed review
- Check each Pro’s profile and read past client reviews

STEP 6
Communicate with the Pro
If needed, message or call the Pro to clarify details or negotiate terms.

STEP 7
Accept a Quote
Choose the quote that best suits your needs. Once you accept a quote, any other pending quotes will be automatically declined. An agreement will automatically be generated.

STEP 8
Complete the Tasks In Your App
New tasks will appear to guide you through this job — follow each step carefully. Make sure to use the
Quality Assurance Checklist, and refer to your
contract and
final Scope of Works whenever needed.
NEED HELP?
Reach Out to Your Build Buddy Pro
If you have any questions or need a hand, your Build Buddy Pro is your best first contact. They’re a licensed expert in their field and can understand the ins and outs of your project. You can message them via the platform, or you can call them directly.
If you have already contacted your Build Buddy Pro and still need further assistance, the Build Buddy Expert Guidance and Support team are here to help. They will be able to guide you on your next steps or help you find answers to any questions you may have.